When designing a custom machined component it is important for the engineer to define all of a part’s characteristics and effectively communicate them to the machinist or fabricator. This is usually done by creating and transmitting an engineering drawing that contains numerical dimensions which define the size and location of every feature of the part. It also communicates other important part attributes including the material type, hardness, allowable dimensional deviations, coatings, fabrication methods and other industrial manufacturing processes.
Surface Finish Requirements
One of the more important requirements a drawing also defines is the surface finish or “allowable roughness” of the many surfaces of a machined part. The surface finish can have a dramatic effect on the ability of the part to fulfill its intended function. Surfaces that need to seal or contain a gas or liquid must be defined in a way that allows them to be leak-tight to the specified levels. Surfaces that have relative motion between them may need to be low or high friction to function, as intended. Even if the surface finish does not have an effect on the function of the part, there may be a purely aesthetic need for it to be improved during the manufacturing process.

Roughness average (Ra) is the most commonly used parameter engineers utilize for defining the surface finish of a part. Ra provides an arithmetic average of surface irregularities measured from a mean line that lies somewhere between the highest and lowest points.
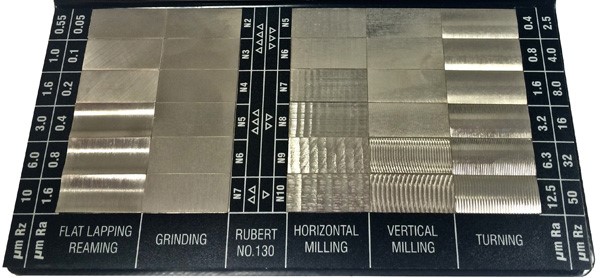
Surface comparators are available for many of the different manufacturing processes that produce a textured surface on a part. They are handy tools that allow an engineer to get a feel for the roughness of a surface at the most commonly specified Ra levels. This is a comparator for many of the common precision fabrication processes in use today. The surface finish chart below provides a visual reference for roughness averages and shows how the different levels of surface finish appear based on the roughness chosen.

If the custom machinery shop is forced to use extensive light finishing cuts, surface grinding, polishing and lapping to meet the specified surface finish, it can double or triple the cost to produce the part. The addition of spot faces, grooves, reliefs, and raised bosses can be added to the product design in order to minimize the size of the surface area requiring extensive surface processing and inspection.
Producing very smooth and highly polished surfaces over large areas can be an extremely costly, manual process. This is generally accomplished with fine abrasive compounds, papers or tapes where the rate of material removal is very slow as compared to the primary machining processes that utilize a cutting tool to remove large amounts of material. If hand grinding and polishing is necessary, one way to reduce the cost of a part containing a highly polished sealing surface is to dimensionally define and minimize the surface area requiring the additional handwork. When specifying surface finishes, the engineer must analyze and understand the downstream time and cost impact of the roughness average (Ra) numbers that are called out on the drawing.

Collaboration for Cost-Effective Solutions
The knowledgeable engineers at Keller Technology Corporation can assist our customers with cost reduction, design for manufacturability and mechanical design optimization services. Keller Technology is a world-class manufacturer of vacuum and pressure vessels, process equipment, electro-mechanical sub-assemblies, and complex machined parts. Our well-equipped, state-of-the-art manufacturing facility allows us to produce fabrications to exacting dimensional surface finish tolerances.
Contact us today with your most challenging manufacturing projects or to learn more about the surface finish specifications.
